Knotworking CS
Creating knotwork in Adobe Illustrator CS
This tutorial will show you how to create knotwork in Adobe Illustrator CS. The method isn't complex, but neither is it obvious.
Note: this tutorial only works in later versions of Illustrator. A tutorial for making knotwork in Illustrator 7 is available here.
Overview
The are four major steps to create knotwork:
- Draw the knot's path.
- Outline the path.
- Divide the outlined path into pieces.
- Join pieces together to create crossings.
The rest of this tutorial takes you through these, step by step, with illustrations. If you'd like to follow along, you can download the sample path (69K) used in this tutorial.
Step-by-step Tutorial
Draw the knot's path
Using the pen tool, draw the path the knot follows. Don't worry at this point about the path crossing itself. Just draw each line that makes up the knot.![[knot's path]](raw.path.png)
Substep: set the path width
![[Stroke palette]](stroke.palette.png) Set the width of your path using the Stroke palette. This is a critical step, and takes some practice. The width should be wider than the desired width of the lines of the finished knot. If you want a knot to have very obvious crossings, use a higher weight. If you're creating an outlined knot, use a higher weight if you want a heavier outline. [Precisely, the desired weight = the weight of the line in the finished knot + the weight of its outline. So if you want a 10-point line with a 5-point outline, enter 15.]
Set the width of your path using the Stroke palette. This is a critical step, and takes some practice. The width should be wider than the desired width of the lines of the finished knot. If you want a knot to have very obvious crossings, use a higher weight. If you're creating an outlined knot, use a higher weight if you want a heavier outline. [Precisely, the desired weight = the weight of the line in the finished knot + the weight of its outline. So if you want a 10-point line with a 5-point outline, enter 15.]![[thickened path]](thickened.path.png)
Outline the path
![[Expand dialog]](expand.dialog.png) Convert the path to an outline using the Object/Expand. In the dialog box, make sure Stroke is checked. This will create an outline of your path. Where lines cross, the intersections are visible as diamonds.
Convert the path to an outline using the Object/Expand. In the dialog box, make sure Stroke is checked. This will create an outline of your path. Where lines cross, the intersections are visible as diamonds.![[outlined path]](outlined.path.png)
Divide the outlined path
![[select 'divide' from the Pathfinder palette]](pathfinder.divide.png) The outlined path is one object which we need to split into separate pieces. For this, use the Divide icon on the Pathfinder palette. Once divided, the intersections are separate pieces which have their own control points.
The outlined path is one object which we need to split into separate pieces. For this, use the Divide icon on the Pathfinder palette. Once divided, the intersections are separate pieces which have their own control points.![[divided path]](divided.path.png)
After division, the resulting pieces are grouped. Ungroup them with Object/Ungroup. If your lines have corners in them, you should deal with them now.
![[swap fill and stroke icon]](fill.and.stroke.png)
At this point, set everything's stroke and fill to black outline, white fill. Select everything, click the toolbar's default fill and stroke icon, and set the stroke weight to some non-zero value.
![[reversed-color path]](reversed.path.png)
Substep: dealing with center pieces
When the outline was created, Illustrator also made pieces out of the all enclosed spaces (tan in the image below). You can get rid of them, or set them aside for later use (such as backgrounds or drop shadows). If you want to keep them, you can select and hide them (Object/Hide Selection), lock them (Object/Hide Selection), or move them (Object/Transform/Move). I usually group them, then move them by a nice round number so I can easily move them back later. This alignment tip might come in handy as well.![[center pieces highlighted]](center.pieces.png)
Merge pieces
We create crossings by merging pieces three pieces at a time. There are two techniques for this: one for when no piece shares two sides of another piece (the usual case), and another when a piece shares two sides with another piece (such as when a loop crosses itself).The usual case
![[select 'merge' from the Pathfinder palette]](pathfinder.merge.png) This is the merge method you're going to use most of the time. In general, you'll be merging three consecutive pieces of the path. The middle piece is the intersection of two lines, and the others touch other insections. (If both ends of a piece loop back to the same intersection, use the other merge method.) Select three consecutive pieces of the path. Unite them using the Merge icon on the Pathfinder palette. Select another three consecutive pieces and repeat. Depending on your knot, you can usually select three pieces along the path, then three pieces that cross the path, repeating the along/cross/along/cross/... pattern.
This is the merge method you're going to use most of the time. In general, you'll be merging three consecutive pieces of the path. The middle piece is the intersection of two lines, and the others touch other insections. (If both ends of a piece loop back to the same intersection, use the other merge method.) Select three consecutive pieces of the path. Unite them using the Merge icon on the Pathfinder palette. Select another three consecutive pieces and repeat. Depending on your knot, you can usually select three pieces along the path, then three pieces that cross the path, repeating the along/cross/along/cross/... pattern.![[one crossing merged]](one.crossing.merged.png)
![[two crossings merged]](two.crossings.merged.png)
![[three crossings merged]](three.crossings.merged.png)
Self-crossing loops
When a path directly crosses itself, merging pieces doesn't work. If you try, the entire loop will become one piece since both ends of the loop abut the crossing.![[pieces selected]](loop.pieces.selected.png)
![[merging creates an error]](loop.pieces.merged.png)
Oops - mistake!
The problem is that one piece shares two sides with a crossing.
![[loop abuts two sides of a crossing]](abutting.pieces.png)
We remedy this by turning that one piece into two, using the knife tool
 . (It's behind the scissors
  on the toolbar.) Draw the knife across the problem piece to cut it in two.
![[piece cut in two]](piece.cut.png)
Select and merge pieces as usual.
![[pieces selected to merge]](pieces.selected.png)
![[pieces merged]](pieces.merged.png)
Rejoin the cut pieces by selecting and deleting the segments that were created when we cut the piece in two. Then join the remaining curves together. Details follow.
Use the direct selection tool
 to select an end segment, then delete the segment (Edit/Clear). You may need to lock (Object/Lock/Selection) the first piece before you can select the end segment of the second piece.
![[end segment of piece selected]](end.segment.selected.png)
![[end segment deleted]](end.segment.deleted.png)
![[end segment of other piece selected]](other.end.segment.selected.png)
![[end segment deleted]](other.end.segment.deleted.png)
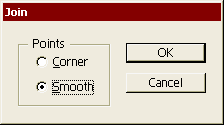 The slight gap in the lower path shows that the two pieces do not connect. To connect them, select two adjacent endpoints by rubber-banding them with the direct selection tool. Join the points using Object/Path/Join. Choose Smooth for the join type.
![[adjacent endpoints selected]](endpoints.selected.png)
Repeat to join the other side of the cut. The result is a smooth loop that crosses itself.
![[correctly joined loop]](correct.loop.png)
That's all there is to this method. With it, you should be able to create knotwork as complex as you desire.
![[joined pieces]](joined.pieces.png)
Cleaning up
There are a few things you'll probably want to do once you've finished creating crossings:
Group the result (Object/Group).
Make the grouped pieces a compound path (Object/Compound Path/Make).
Set colors (because it should be pretty, shouldn't it?)
Help! It doesn’t work!
Expanding the stroke works differently in later versions of Illustrator (e.g. CS3). Sometimes when you expand a stroked path, you don’t get diamonds at path crossings. Instead, it looks like you outlined the stroked path instead.
Reader Jennifer J. offer this advice if this happens:
- Go to Object/Flatten Transparency
- Check Convert strokes to outlines
- Expand as above
Jennifer also recommends seeking assistance on Adobe’s forums. You’ve got a better chance of getting an answer there than from me.
Thanks, Jennifer!
Bonus Illustrator CS tip: cutting file size
By default, Illustrator CS makes huge files. Creating and saving an empty document yields a file that's a whopping 341 KB. That's not a typo; that really is 341 kilobytes.
What's taking up all that space are the swatches, brushes, symbols, and graphic styles in Illustrator's default template. To make your files as small as possible, delete all the brushes, symbols, swatches, and styles, then File/Save As Template to create a minimal template. When you create a new project, use File/New from Template and choose your minimal template. You'll save around 300 KB per file.
This is especially handy when creating files for Web distribution.
Last updated 9 October 2008
http://www.rdrop.com/~half/Creations/Art/Knots/knotwork.tutorial.html
All contents ©2005 Mark L. Irons