The Chicago School of WatchmakingHome Study Course |
|
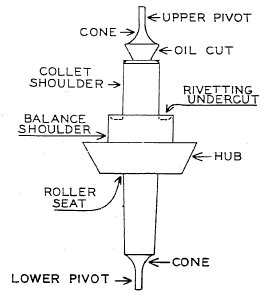
Master WatchmakingA Modern, Complete, Practical CourseLesson 15REPLACING FACTORY BALANCE STAFFSChicago School of Watchmaking Founded 1908 by Thomas B. Sweazy SEC. 350 - The Balance StaffThe balance staff is sometimes referred to as the balance arbor. It is usually made of tempered steel. The balance wheel is attached to the balance staff and the pivots of the staff rotate in the balance jewel assemblies previously described.Replacing a balance staff properly, together with the and of the balance wheel, affords an opportunity for the watchmaker to demonstrate his ability as a master workman. It is in this part of the watch that the unskilled workman most often delights in giving horrible examples of "botchwork." While you may come in contact with some of the "botchmaker's" art at other points - such as attempting to splice a mainspring in the center - it is in and around the balance and balance staff that such a person seems to delight in showing the improper methods of making repairs. In a great many instances, these errors have been made by using material that did not fit. Perhaps an attempt was made to substitute another make of balance staff. If the staff was too long or too short the balance cock was bent up or down. If the hub of the staff was too small for the balance, soft solder was used to fill in the gap. If the hole in the roller be too large for the balance staff it was remedied by using glue or cement to hold the roller. If the collet shoulder was too small the collet was pinched together, throwing the hairspring out of true and giving a poor holding for the collet. If the hole in the jewels appeared to be too small the pivot was ground or filed by hand until it entered the jewel hole. If the hairspring was too strong for the balance it was weighted down with an excess of washers or soft solder. These examples are not suppositions, but are actual cases as well as many other examples of what an ingenious "botchmaker" will do (When compelled to figure out a method to make repairs) when it would have been much easier to do the work properly in the first place, without danger of placing the Watch in such condition that it could not run or be timed properly until practically rebuilt by a master watchmaker. Over a period of years there have been a great many attempts made to prevent poor quality watch repairing. Some states have licensing laws which are set up to protect the public against these practices. However, the one way to be certain that the public is adequately protected is by properly educating the watchmaker to make repairs correctly. The educator can only show the student the correct procedure. The student must practice until he is proficient; and at this time let me remind you again that proficiency can only be accomplished by practice. Do not attempt to make repairs on watches other than those you have for practice work. It is surprising what liberties some people will take with another person's watch rather than admit, even to themselves, that they do not know how to correct a very minor defect. This lesson is difficult, not because the work is hard to understand but because to do balance staff work properly, you will also require instruction in truing and poising the balance. If a factory balance staff has a pivot that requires polishing or needs to be reduced slightly in diameter, it must be done on a watchmaker's lathe. There are times When the collet shoulder, balance shoulder, or roller table post require slight alterations, and these also require a watchmaker's lathe to complete properly. The purpose of this lesson is to teach you to replace a staff even though you have not had the instruction on lathe work. You must understand this part of staff replacement in order to understand when and how to make alterations with a lathe. This lesson is comparable to learning the letters of the alphabet. After you have mastered the you learn to combine these letters with each other to form simple words. Then as your education advances your vocabulary increases and you can read or write with ease words which would be difficult if it were not for the proper procedure used to teach you the elementary principles of reading and Writing.
SEC. 351 - Types of Balance StaffsGenuine factory staffs are, as a rule, accurately made and easily replaced. When we refer to any piece of watch material as being genuine we mean it was made by the factory which made the originally for the particular model of watch in which it is being placed. Any other material, although it would fit properly, is referred to as imitation material. Use genuine material whenever possible. Take your time. Remember the pivots on balance staffs are only two to three times as thick as a human hair and being made of tempered steel can be broken easily.The dimensions of balance staffs vary for different models even in the same size and make of movement. One of the older American factories, now out of business, had eight models all of the same size, each using a balance staff of different dimensions. This is usually due to a change or refinement in the model. For this reason it is well for the beginner to note the general types of balance staffs used in the different makes and sizes of watches which he handles. Some hubs you will observe are thicker than others or are cut on a different angle. On still others the collet shoulders may vary in diameter for the same models or different models of the same size. In selecting a replacement for a broken staff you must be able to judge which particular number of an assortment is the one required. The final proof of your correct selection is if all parts fit properly and when replaced in the watch, there is the correct amount of sideshake and endshake. When a watch comes to you for repairs it should always be tested to see, if the balance staff is broken. Grasp the arm of the balance wheel with tweezers and endeavor to move it from side to side as in testing for sideshake. If the lower end of the staff can be moved from side to side and also up and down, the chances are that the lower pivot is broken although it may act in much the same manner if the lower jewel is broken. The same test is used for the upper pivot. Often when a watch receives a jar or a fall hard enough to break the balance staff, one or more of the balance jewels may be broken also, so do not rely on such a superficial examination. Only by removing the balance and examining the pivots and jewels with a double loupe can the watchmaker make a fair and intelligent estimate.
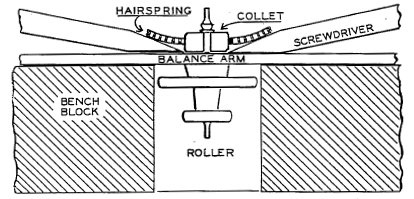
SEC. 352 - Removing Hairspring
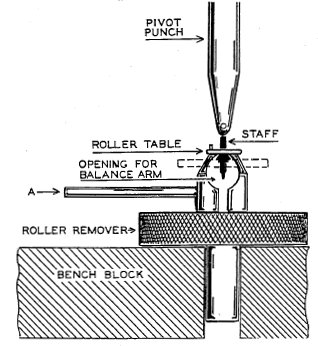
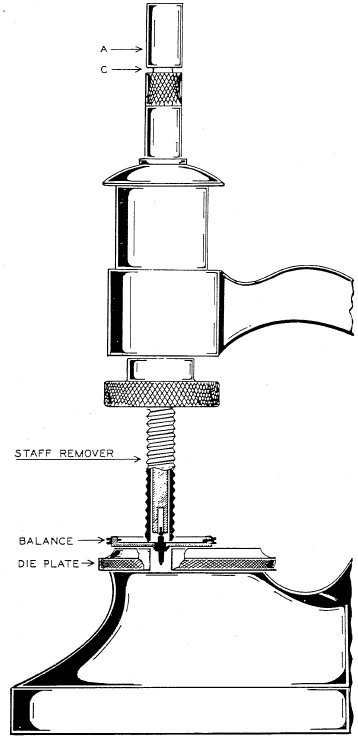
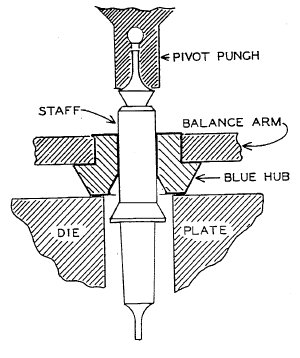
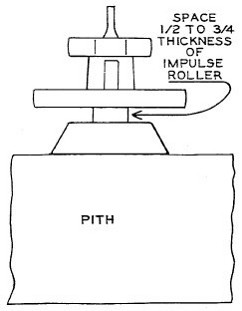
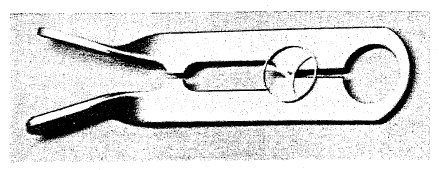
SEC. 353 - Removing the Roller TableIn the lesson on setting roller jewels, the three most common types of roller tables were described. There are many types of roller removers on the market, but the Rex roller remover described hereafter will do the job in most cases. Figure 15-4 illustrates the procedure. The roller remover is placed in the die plate of the staking tool or on a bench block. Holding the knurled edge of the roller remover between the thumb and forefinger, open the jaws of the tool by means of the small handle at A. Place the inverted balance over the jaws of the roller remover with the arm of the balance through the opening of the jaws. Carefully tighten the jaws until the roller table is in the position shrwn. Place the pivot punch, which is furnished with the tool, over the pivot and tap lightly with a brass hammer. This will loosen the roller table enough to be removed with the tweezers. Two piece rollers maybe removed by the same method. However, the impulse roller will loosen first and will move up against the safety roller. Another light tap will loosen the safety roller, after which both rollers may be removed.
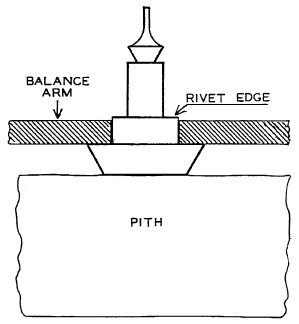
SEC. 354 - Removing the Balance StaffMany watchmakers make a practice of driving out the balance staff without undercutting. This is done by placing the hub of the balance in a hole large enough to receive it without binding in the die plate of the staking tool, and after centering, punching it out with a pivot punch. This is poor practice and the work of inefficient workmen, for since the staff is made of tempered steel and the upper edge of the balance shoulder is riveted over the arm of the balance, this method has a tendency to enlarge the hole in the arm. In time the arm will be bent to such an extent that it will be difficult to true.
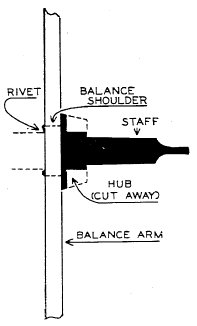
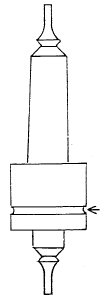
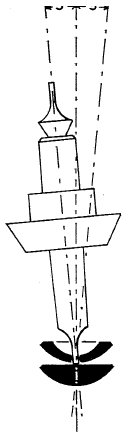
Figure 15-5 illustrates a balance staff with the roller removed but still riveted to the balance wheel. The staff in turn is held in a lathe chuck, the latter not illustrated. The staff, which is solid black, shows that portion which is left after part of the hub has been cut away. The dotted lines indicate the hub before it was cut away. Notice that it has been cut below the balance shoulder which is indicated by the dotted line. As you, can see, this leaves a very thin rim over the balance arm.
SEC. 355 - Pivot Straightening
Example: Bent Pivot - diameter .10 mm
Occasionally you will find a pivot which has become riveted on the end due to a jar or fall forcing the pivot directly against the cap jewel. this occurs it is difficult to remove the pivot from the balance jewel and in some cases it is necessary to remove cap jewel if possible and stone off the with an oilstone slip.
SEC. 356 - Matching the Balance StaffIn selecting a new balance staff for a watch it is necessary to know the make, size, and model and then match the staff accordingly. As stated previously, there may be several different models of Watches in the same size of the same make. For instance, we may have a 16 size watch which requires a staff with a short hub and another model which may require a long hub, or we may have one with a large collet shoulder and another with a small collet shoulder. You will soon become familiar with the different models and eventually you will recognize the most common numbers by looking at the staff.After you have selected a staff which you believe to be the correct model, make the following comparisons:
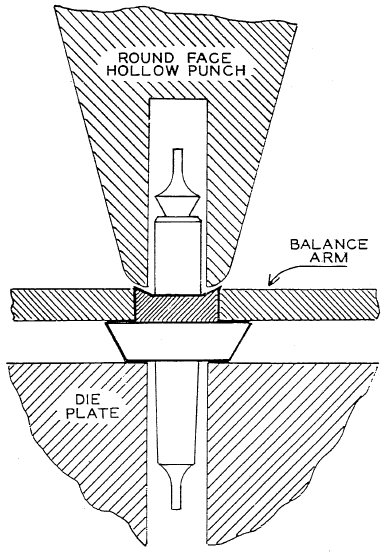
SEC. 357 - Riveting the StaffReplacing a riveted balance staff is not a hard job, but each operation must be carefully executed, and the proper holes in the dieplate of the staking tool, together with the proper punches must be carefully selected.
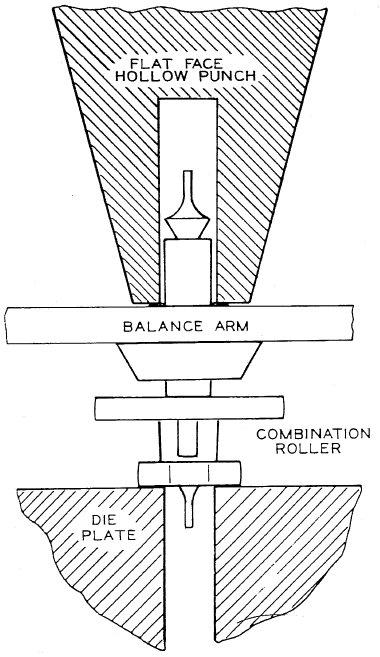
SEC. 358 - Replacing the RollerIf the roller to be replaced is a combination roller, the previous operation requiring the use of the flat face hollow punch is repeated with the combination roller in place, figure 15-16. The roller jewel is usually placed at right angles to the arm of the balance wheel.
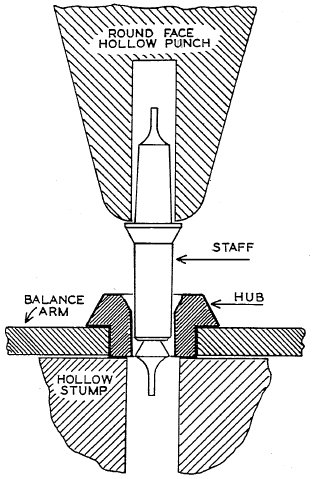
SEC. 359 - Replacing Friction StaffsIn selecting a friction staff, the same procedure is followed as in selecting a rivet type staff except that the post which enters the hub must just start into the opening in the hub. The difference must be made up by staking the staff in place.
Always make the following tests before replacing the hairspring:
SUPPLEMENTARY INFORMATIONSEC. 353A - Removing the Roller Table
|
|||||||||||||||||

Member of the American Watchmakers-Clockmakers Institute |
|
||
|
|
|||
Comments to jsexton@agora.rdrop.com , or back to Jeff's home page...


 More
More