|
Master Watchmaking
A Modern, Complete, Practical Course
Lesson 29
LATHE WORK
Chicago School of Watchmaking
Founded 1908 by Thomas B. Sweazy
Sec. 490 - The Importance of Lathe Instruction
By now you should be familiar with the principles and functions of the average watch movement. These principals and functions have been presented step by step in order that you may make the repairs necessary to qualify you as an expert. It should be obvious to you by now that it is much better to purchase good tools and the proper material for replacements in watch repairing than it is to endeavor to make such repair parts yourself. In years gone by, this was not always possible. The manufacturers of American watches endeavored to produce watches and materials with interchangeable parts. This was not true of imported watch movements and it was necessary for the watch repairman to be able to make a great many parts. Many times he had to make the tools to make these parts. In recent years the manufacturers of American watches have greatly improved the system because they have been benefited by automatic machinery. The same is true of imported watches and today it ms much more profitable for the watchmaker to purchase his replacement parts and devote the time he would spend making them to making repairs on other watches. However, the Master Watchmaker must be able to determine quickly if replacement parts will function properly when used. Many times he will find watches which have been botched by so-called repairmen and in order to make the repairs he will have to undo the botch work before he can proceed in a workmanlike manner.
For this reason it is necessary for the student to acquaint himself the methods used in making certain parts. The satisfaction derived from doing a job better than the next man cannot be in dollars and cents, but is the main difference between the ordinary repairman and the one whose success is measured by the better things in life he seems to acquire.
The lessons on lathe Work are made up of a series of explanations and illustrations covering the making of a few small tools and the principles of parts making. The student will gain much by practicing these problems and will, upon occasion, have to make repairs along these lines. He will become adept at handling the watchmaker.s lathe without which no watchmaker can do a master job. Each problem is approached step by step. Read your instructions carefully and refer to the illustrations frequently.
SEC. 491 - Turning Square Shoulders
|
Our first exercise will be the turning of square shoulders brass. Take a piece of 4 mm brass rod and insert it in a 40 chuck, figure 29-1, extending it about l0 mm from the face of the chuck. Set the T rest parallel to the 4mm brass rod as illustrated in figure 29-2. The height of our T rest should be about on the center line of our work, figure 29-3.
Figure 29-4 illustrates the method of holding a square cutting graver. The forefinger of the right hand is placed along the edge of the graver as illustrated with the handle in the heel of the hand. The thumb and the rest of the fingers fall naturally in place. Figure 29-4 illustrates the graver held in position ready to make a cut. The forefinger of the left hand is placed on the side of the graver as illustrated. In this Way, the graver can be moved to the right or left depending on which finger exerts the most pressure. Now running the lathe toward you in the direction of the arrow, figure 29-4,move the graver against the brass rod until a small shaving appears. The position of the graver in figure 29-4 will produce this shaving if we have met all the conditions in figures 29-2 and 29-3. If your graver fails to produce shavings,it will be up to you to move your graver handle up or down or to either side until the cutting edge of the graver produces these shavings. Do not proceed early further until you can cut shavmngs rapidly, moving the graver either to the right or to the left.
Figure 29-5 illustrates the first cut necessary to produce a square shoulder. The point is carefully moved forward until we produce a small cut as shown in this figure. Do not go too deep with the first cut. Holding the graver in the position shown in figure 29-6, remove the section illustrated by the dotted line. Figure 29-7 shows the finished square shoulder. It is possible for us to a square shoulder of any desired diameter and length.
|
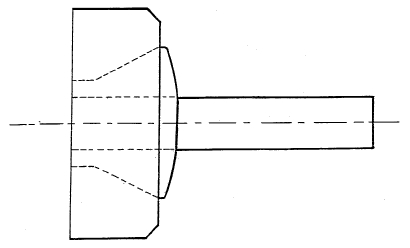
Fig 29-1
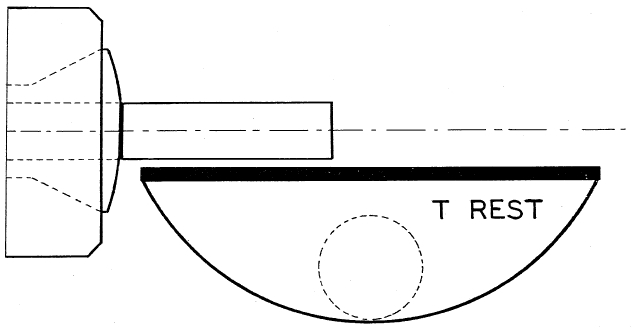
Fig 29-2
|
|
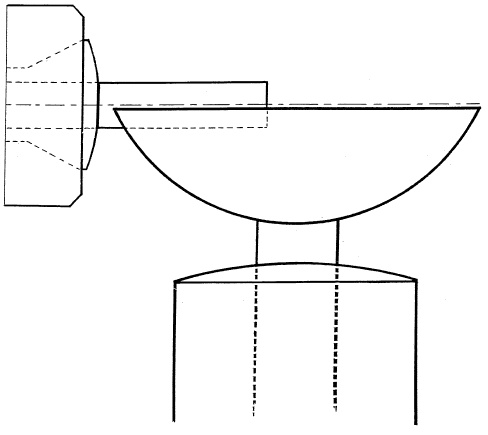
Fig 29-3
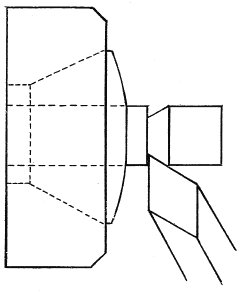
Fig 29-5
|
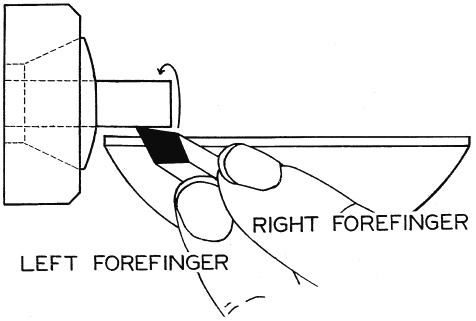
Fig 29-4
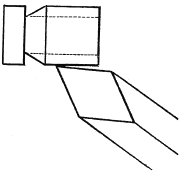
Fig 29-6
|
|
Figure 29-8 illustrates under cut. It is done by starting the graver in the position shown and moving in the direction of the arrow. Figures 29-9 and 29-10 illustrate two types of incorrect square shoulders. In turning square shoulders in steel, the same method is followed but you will find steel will cut much more slowly and you will have to Sharpen your gravers oftener.
|
Fig 29-7
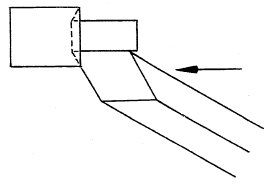
Fig 29-8
|
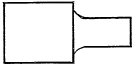
Fig 29-9
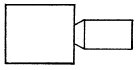
Fig 29-10
SEC. 492 - Centering Stock
|
In order that we may drill brass or steel which is held in a lathe, it is necessary to locate the exact center of our material. Move the T rest parallel with the face of the rod as in figure 29-11 and face off material. Start cutting point of the graver as close as possible to the center of the Work until you have obtained the cut shown in figure 29-12. This is the exact center of our work and can be tested by using an ordinary small needle held in the position shown in figure 29-13 with the lathe revolving. If the work ms centered properly, the needle will stand still. If you have not obtained the exact center, the needle will wobble. If such is the case, it is because you have left in your center a little point which must t be removed. Figure 29-14 illustrates incorrect centers.
|
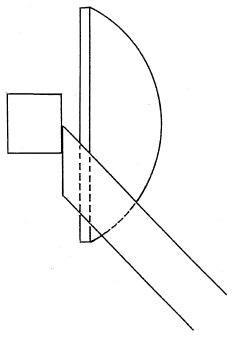
Fig 29-11
|
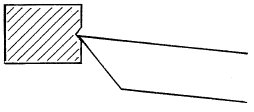
Fig 29-12
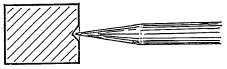
Fig 29-13
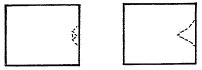
Fig 29-14
|
SEC. 493 - Using A Saw with the Lathe
|
To cut off work held in a lathe, cut a groove in your work as shown in figure 29-15. Use a jeweler's saw with the teeth of the saw pointing toward the handle and place saw blade in groove while the lathe revolves backward. Be careful not to use too much pressure when nearing the center of your work as your work is liable to jump away.
|
Fig 29-15
|
SEC. 494 - Making a Hardened Steel Burnisher
|
When setting a jewel, it is necessary to burnish the metal over the edge of the jewel. For this purpose a hardened steel burnmsher is required. It can be made from 3 mm round drill rod about 3 inches in length as follows:
- 1. Turn down the end as in figure 29-16. Do not get it too pointed or too round.
- 2. Polish with emery buffs in the following rotation: #2, #1, #0, #2/O, #3/0 and #4/O.
- 3. Harden. (Lesson 27 Sec. 463.)
- 4. Temper to a very light straw at the tip. (Lesson 27 - Sec. 464.)
- 5. File Tang, figure 29-17, and repolish.
- 6. Mount in graver handle.
|
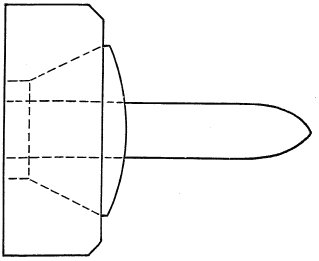
Fig 29-16
|

Fig 29-17
SEC. 495 - Making Flat Drills
- 1. Determine the diameter of the drill and select a section of drill rod slightly larger than that diameter. It is best to have the shanks of all your drills of one size.
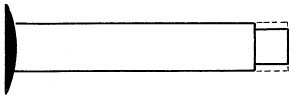
Fig 29-18
- 2. Turn a square shoulder at the end of the rod to the diameter of your drill, figure 29-18. The length of the drill is then determined by this diameter, being usually about five times the diameter. (Example: The shank of a drill measuring .5 mm in diameter would be about 2.5 mm long.)
- 3. Turn back Shoulder as illustrated in figure 29-19 to the correct length.
- 4. Bevel end of rod at about 30 degrees, figure 29-20.
|
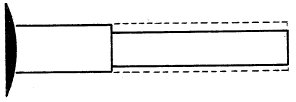
Fig 29-19
|
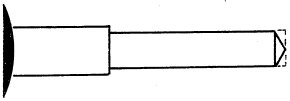
Fig 29-20
|
- 5. Taper from the corner of bevel to back of drill as in figure 29-21.
- 6. From this point make a small curve at A, figure 29-22.
|
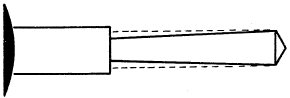
Fig 29-21
|
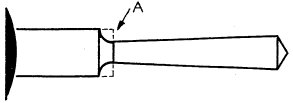
Fig 29-22
|
- 7. Reverse lathe motor and polish with emery buffs in the following rotation: #2, #1, #0, #2/0, #3/0, and #4/0. Hold your emery buffs on the underside and use the full length of the buff while moving it back and forth with the lathe running in reverse.
- 8. Set index pin in hole zero and with a flat file, file top of drill as illustrated by dotted line, figure 29-23. The T rest can be used as a steady rest for your file.
- 9. Remove index pin and turn head of lathe 1/2 turn. Replace index pin in hole marked 30 and file this side exactly the as in figure 29-24. The drill will now appear as in figure 29-25.
|
Fig 29-23
|
Fig 29-24
|
Fig 29-25
|
- 10. Polish the flat sides of the drill with emery buffs mn the following rotation: #2, #1, #0, #2/0, #3/0, and #4/0.
- 11. Cover drill with soap or boric acid, heat to a cherry red and plunge into cold Water. (Lesson 27 - Sec. 463.)
- 12. Repolish and temper to a light straw (Lesson 27 Sec. 464) then polish off the color and polish shank.
Most drills are marked in 10/1000th of an inch. However, We will make ours to correspond to the metric system.
- 1. Reverse drill in lathe, finish the end of stock with a graver, and polish with emery buffs. File a small notch as in figure 29-26.
- 2. With the edge of a file, mark the drill with Roman numerals to correspond with the metric measurement, figure 29-27.
|
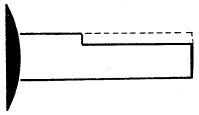
Fig 29-26
|
Fig 29-27
|
SEC. 496 - Making Taps
In making taps use a Swiss Screw Plate as shown in figure 29-28 to cut the threads. There are different types of Screw Plates containing from 5 to 60 holes and having double or single notches. The screw plate in figure 29-28 is double notched and these notches allow the shavings to break clear. In this particular screw plate the die holes directly across from each other are of the same size.
Fig 29-28
To make a tap, use any size drill rod of suitable diameter and proceed as follows:
- 1. Determine the diameter of tap. If the finished tap is to be a #6, allow a difference of 2 numbers when ascertaining the diameter of the tap; in this case, it would be #4 hole.
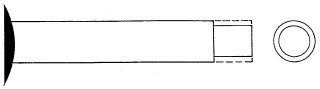
Fig 29-29
- 2. Turn a square shoulder on the end of rod, figure 29-29, that will just enter hole #4 on the screw plate.
- 3. Measure this diameter with millimeter gauge and multiply by 5. This will give the length of the tap.
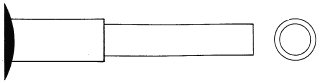
Fig 29-30
- 4. Turn back shoulder to this length as shown in figure 29-30.
- 5. Bevel the end at about a 60 degrees angle, figure 29-31. Turn curve and cut back, figure 19-32.
- 6. Place screw plate on end of rod using hole one size larger than the finished tap, figure 29-33; in this Case hole #5.
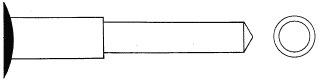
Fig 29-31
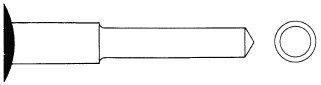
Fig 29-32
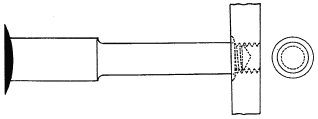
Fig 29-33
- 7. Hold screw plate with right hand and with left hand on lathe pulley, turn pulley toward you about 1/2 turn. This should Start the thread.
- 8. Place a little oil on the rod and continue turning lathe pulley another half turn. A good thread should now be started.
- 9. Now reverse motion of left hand, about 1/4 turn and then 1/2 turn. Each forward turn will chase a new section of thread and the reversing breaks out the excess metal, figure 29-34.
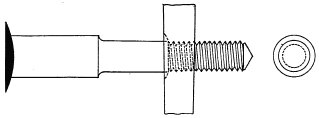
Fig 29-34
- 10. Repeat this forward and backward motion until tap is completely threaded, and then remove screw plate.
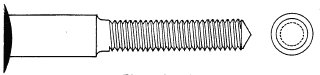
Fig 29-35
- 11. Now place screwplate on rod using selected finished thread size, in this case #6, and repeat steps 7, 8, 9, and 10. Your finished Work should appear as in figure 29-35.
- 12. Set index pin at zero and file across and through threads as shown in figure 29-36.
- 13. Turn index 1/3 the way around and file through and across threads as shown in figure 29-37.
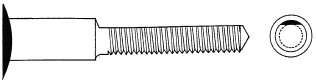
Fig 29-36
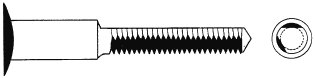
Fig 29-37

Fig 29-38
- 14. Turn index 1/3 Way around and repeat filing process. The tap will now appear as in figure 29-38 side and end view.
- 15. Set index back at zero and then move backward 3 holes. With file held at an angle of about 10 degrees, cut away the back of the first few threads, figure 29-39. Do this on all three sides. This will allow your tap to start easily.
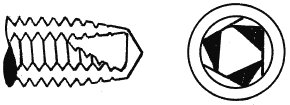
Fig 29-39
- 16. Polish with emery buffs.
- 17. Harden. (Lesson 27 - Sec. 463.)
- 18.Temper to a light straw at the tip to a medium straw at the back. (Lesson 27 - Sec. 464.)
- 19. Taps are used the same as a screw plate, 1/2 turn forward and 1/4 turn backward. The hole to be tapped must first be drilled. Use a drill about 2 numbers smaller than the size of tap measured by holes in the screw plate. Taps can be marked the same as drills, figure 29-27.
SEC. 497 - Making A Screw
- 1. Turn down drill rod to the proper diameter for the head of the screw, figure 29-40, and polish.
|
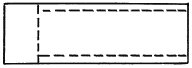
Fig 29-40
|
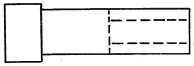
Fig 29-41
|
- 2. Select thread size and follow procedure for making tap, figures 29-41, 29-42, 29-43, and 29-44.
- 3. Face off under side of screw leaving a small notch as shown at A, figure 29-45.
|
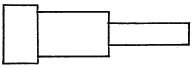
Fig 29-42
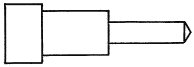
Fig 29-43
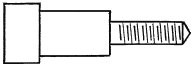
Fig 29-44
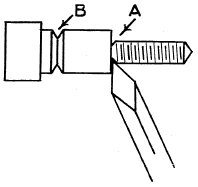
Fig 29-45
|
|
- 4. Cut notch as shown at B, figure 29-45, and saw off.
- 5. Reverse screw in lathe, face off the head of screw and bevel the corner, figure 29-46.
|
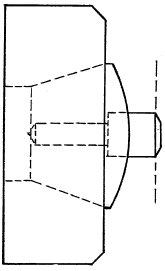
Fig 29-46
|
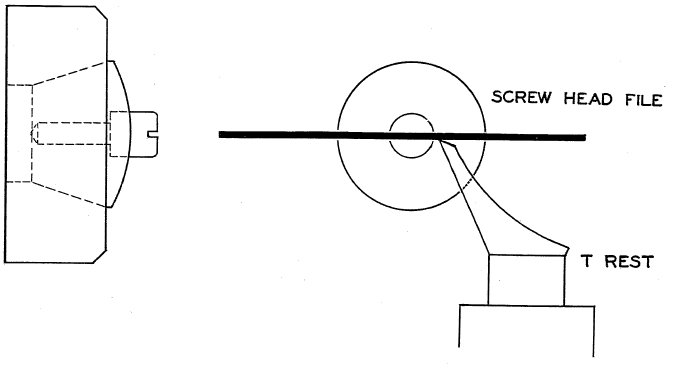
Fig 29-47
|
- 6. With a screw head file cut slot in head of screw, figure 29-47, using the T rest as support.
- 7. Polish head of screw with emery and harden (Lesson 27 Sec. 466) and temper to a blue (Lesson 27 - Sec. 466, figure 27-2O).
- 8. Polish off the color or leave blue, Whichever is preferred.
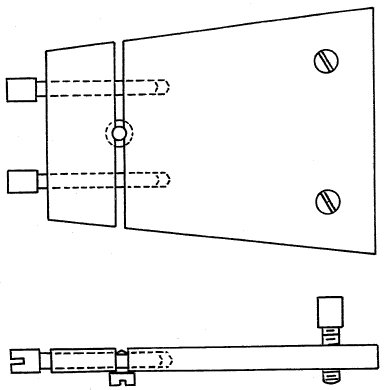
Fig 29-48
- 9. Figure 29-48 illustrates the screw held in a tripod device when a flat surface is desired.
SEC. 498 - Making A Pipe for a Second Hand
- 1. Select a piece brass wire of small diameter and place, in chuck, figure 29-49.
Fig 29-49
Fig 29-50
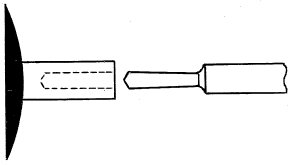
Fig 29-51
- 2. Center, figure 29-50, and drill hole as illustrated in figure 29-51. This hole should be slightly smaller than the 4th wheel pinion pivot.
- 3. Turn down outside diameter to desired measurement.
- 4. Turn square shoulder seat on which hole in second hand will fit snugly.
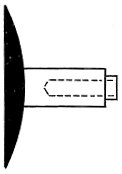
Fig 29-52

Fig 29-53
- 5. Place second hand in place and burnish brass over second hand at A, figure 29-53.
- 6. Finish with stripping tool.

Fig 29-54
- 7. Cut notch in wire at desired length and saw through wire carefully, figure 29-54.
- 8. Broach hole in pipe from the under side with pivot broach. The second hand should fit friction tight.
Sec 499 - Replacing a Dial Foot
The following procedure of replacing a dial foot is for a hard enamel dial. Replacing a dial foot on a metal dial is not too practical as in most cases the dial must then be sent out to a dial painter to replace the figures, finish, end lacquer.
|
|
- 1. With a small carborundum wheel held in the lathe cut off old dial foot by grinding through a section of enamel until the copper is exposed, figure 29-55.
Fig 29-55
- 2. With a sharp pointed scriber and steel straight edge draw two lines at right angles to each other through the center of the old dial foot, which usually can be distinguished even through the ground finish, figure 29-55. It is also possible to place dial in place over the pillar plate and with a sharp pointed scriber, locate the center of the proposed dial foot.
- 3. Place a piece of brass wire in lathe and turn down the end until it will enter hole in pillar plate, figure 29-56. Turn larger diameter for the base about three times the diameter of the small end.
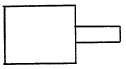
Fig 29-56
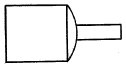
Fig 29-57
- 4. Curve back corner slightly as shown in figure 29-57.
- 5. Cut notch as shown in figure 29-58 and saw off.
- 6. Reverse in chuck, figure 29-59, and hollow slightly as shown in figure 29-60.
|
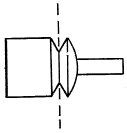
Fig 29-58
|
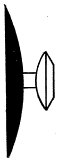
Fig 29-59
|
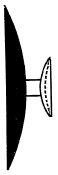
Fig 29-60
|

Fig 29-61
|
- 7. Place dial foot in soldering tweezers, figure 29-61, with soldering flux and heat over alcohol lamp. Fill hollow with bismuth soft solder. (See Lesson 27 - Sec. 468.)
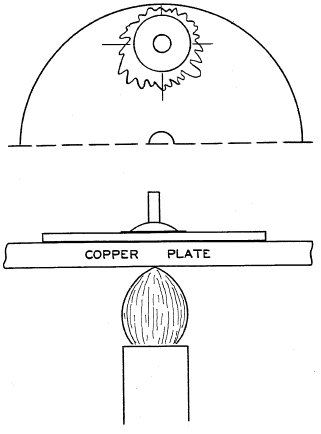
Fig 29-62
- 8. Place dial on thin copper plate, cover ground section with soldering flux and place dial foot directly over center lines, figure 29-62.
- 9. Warm this copper plate over alcohol lamp until solder flows . Remove dial and let cool slowly. Wash thoroughly with Water and dry carefully.

 More lessons from the
Chigago School of Watchmaking course... More lessons from the
Chigago School of Watchmaking course...
|
|
|
